Overview
The DE1-SOC development platform is designed around an Intel Cyclone® V SE 5CSEMA5F31C6N SoC (System-on-Chip). This is a dual core 800MHz Cortex-A9 processor with 1GB of DDR3 memory, a 2 port USB host, and a 1 gigabit Ethernet PHY.
A good question to ask is how does this processor differ from the microcontrollers you’ve experienced in your previous course work? The simplest way to answer that question is to say that the Cortex-A9 family of ARM processors is much more powerful than a microcontroller. The Cortex-A9 family supports a memory management unit (MMU) that will allow us to implement virtual memory and support many of the constructs required for simultaneous multithreading. The gigabit Ethernet PHY allows for the device to support complex network data transactions. These capabilities allow the Intel SOC to handle an entire range of computing environments that a typical microcontroller simply cannot. As is often the case, adding additional capabilities leads to additional complexities.
DE1-SoC Linux Setup
In order to program the FPGA on the DE1-SOC, we will first need to configure the SD card used to boot the DE1-SoC. We can configure the SD card using a Linux VM (virtual machine) found on the lab PCs. This virtual machine provides an Ubuntu 16.04 environment where most of our Linux software development will take place.
The FPGA is actually programmed using a rbf (raw binary file) generated from Quartus. The rbf file is loaded into the FPGA from U-Boot (Universal Boot Loader). In addition to formatting the SD card with U-Boot, the SD card will also contain a Linux Kernel image(collection of device drivers and resource management) and an Ubuntu based filesystem (set of applications). These two items (Linux Kernel and Ubuntu Filesystem) will be used in later labs and for your project.
Imaging DE1-SoC Micro SD Card
1. Start the Linux VM by opening VirtualBox. If you do not have access to the ECE453 lab computers, you can set up a Linux development environment by installing Ubuntu 16.04 on a Virtual Box VM. You can use the following post to set up the remainder of the Linux build environment for the DE1-SoC.
2. Plug in your USB-to-?SD dongle. Be sure that the ?SD card is inserted into the dongle.
3. Verify that your VM has been configured so that the ?SD card is connected to the Linux VM and not the Windows Host. After the VM has booted into Linux, from the top menu bar, select Devices?USB?USB Settings.
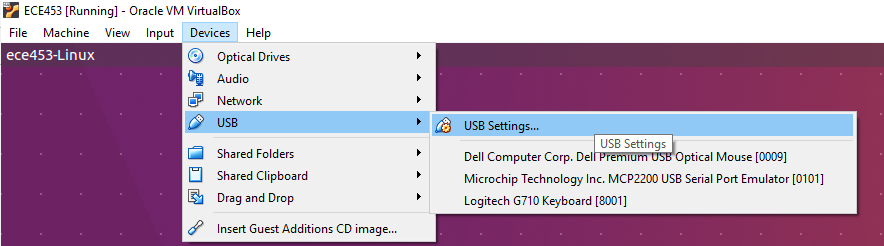
You will then create a new filter for the USB-to-?SD dongle.

4. Log into the Linux VM. Your TA will supply you with the login credentials.
5. Close the two File Explorer Windows for the USB icons on the left.

6. Open a Terminal command prompt.

7. The following Linux commands can be used to transfer the filesystem image to the ?SD card. This may take 10-15 minutes to complete. (FIXME : Public location to download the image)
cd /home/ece453/shared
sudo dd if=ECE453_f18.img of=/dev/sdb bs=1M
Configuring the DE1-SoC to Load FPGA from U-Boot
1. When the dd command finishes, unplug the ?SD-to-USB adapter and plug the ?SD card into the DE1-SOC.
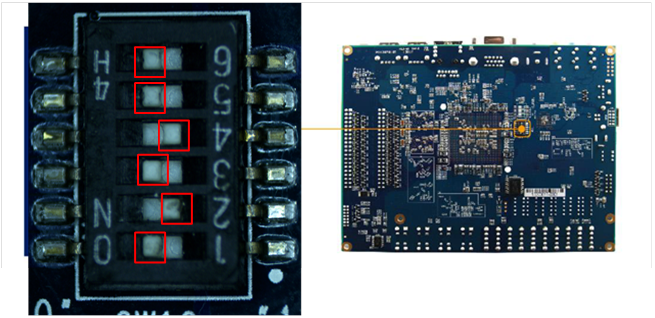
2. Make sure that the DE1-SOC is configured for ASx4 Mode by setting the configuration dipswitches on the back of the board. The red squares indicate the position of the switches.
Setting Up the Serial Console
Plug in your mini-USB cable into the DE1-SoC UART-to-USB port found in the upper right hand portion of the board.
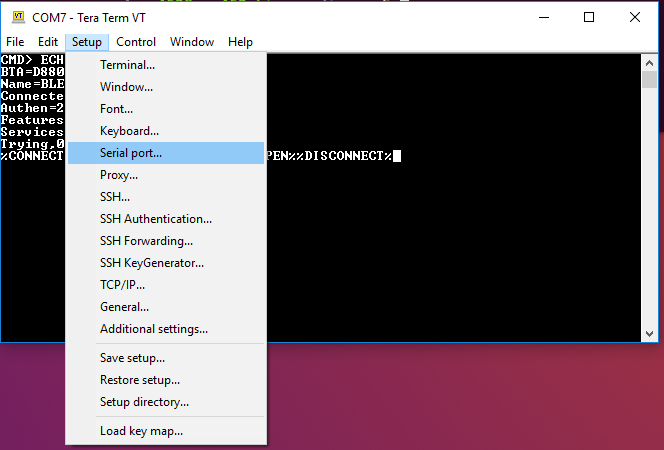
The most common way to access Linux on a SBC (Single Board Computer) is through the serial interface. There lots of serial terminal programs available for use, but we will use TeraTerm. When you open TeraTerm, you will need configure the serial port for a baud rate of 115200.

Once you have the serial terminal configured correctly, plug in the DE1-SoC power supply and press the red power button found on the left side of the board. You should see boot message begin to print out on your serial terminal. This process will 10-15 seconds to complete before you are prompted to log into the Linux filesystem. You can login using the following information
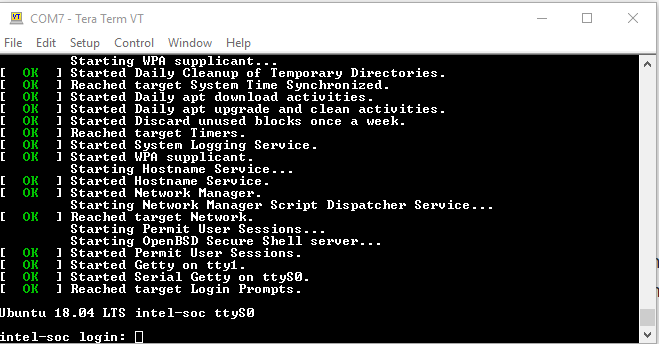
username: ece453
password: password