Overview
When choosing what type of filesystem to use in your design, the two most basic design decisions that you will need to address is flexibility vs performance. Having a full Linux distribution at your disposal helps speed up development time due the relative ease at which you can add new capabilities. On the other hand, having so much extra software running in the background can lead to lower performance (many systems do not need networking or printing services running in the background).
In situations were you need a very quick boot time or the scope of required software packages are relatively small, we can make use of Buildroot. Buildroot is a tool that can generate a smaller, faster, and more customized filesystem that meets the specific requirements of a design. Smaller, faster, and more customization sounds great, but it does come with a price. Many of the software packages available to Buildroot are a more simplified and less capable version that what is available in a full Linux distribution. You will also have to compile many of these applications from source code and resolve any dependencies these applications may have.
This post will cover how to generate a Buildroot based filesystem, but if you need the flexibility of a full Linux distro, see the post on building an Ubuntu based filesystem.
Buildroot Based Filesystem
Many of the steps shown here were taken from this excellent post.
Step 1: Download Build Root
cd
git clone git://git.buildroot.net/buildroot
cd buildroot
Step 2: Check out the most recent release of Buildroot
# List the current releases
git tag -l

# Check out the newest official release.  2018.05 at the time
# of writing.
git checkout 2018.05
Step 3: Configure Buildroot
This step assumes that you have configured your Linux build environment as described in this post.
cd

# Make sure you checked out build root into your home dir
make -C buildroot/ nconfig
The following screen should pop up.
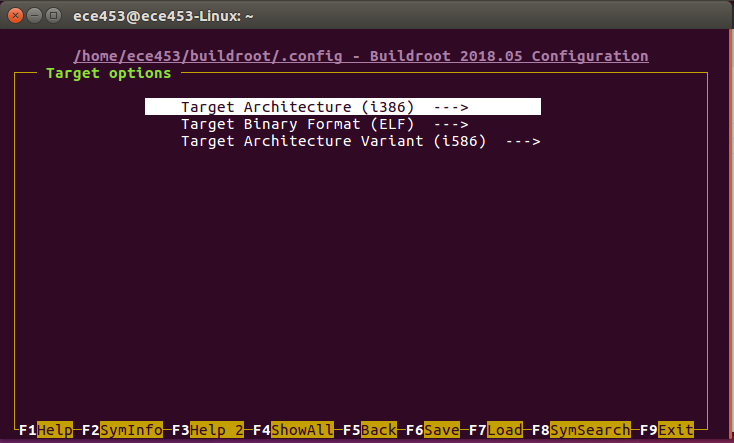
Select Target Options by pressing Enter.
Make changes to the following options
- Target Architecture: ARM (little endian)
- Target Architecture Variant: cortex-A9
- Enable NEON SIMD extension support (NEW): Enable
- Enable VFP extension support (NEW): Enable
- Target ABI: EABIhf
- Floating point strategy: NEON
- ARM instruction set: ARM
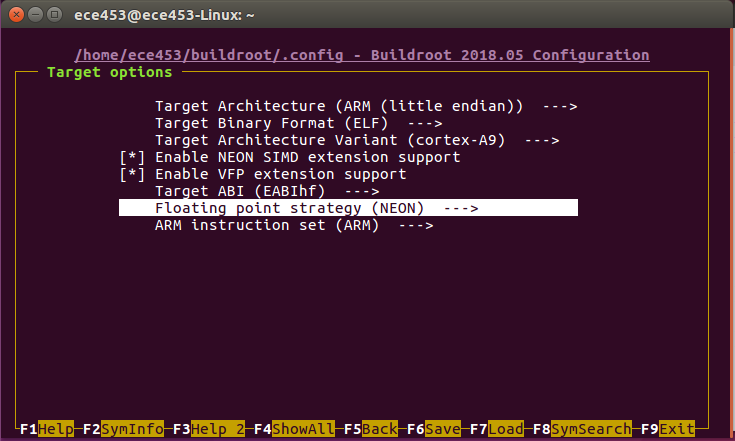
When you are done, hit the ESC button and then enter the ToolChain menu by highlighting Toolchain and pressing ENTER.
The following settings should be made for compiling Buildroot using v4.16 Linux Kernel and the GCC v7.2-2017.11.
- Toolchain type: External toolchain
- Toolchain: Custom toolchain
- Toolchain prefix: arm-linux-gnueabihf
- External toolchain gcc version: 7.x
- External toolchain kernel headers series: 4.10.x
- External toolchain C library: glibc/eglibc
- Copy gdb server to the Target (NEW): Enable
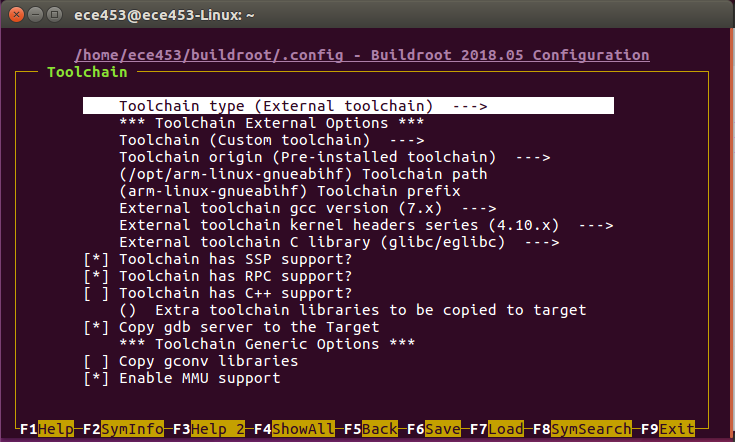
Once the Toolchain has been configured, press the ESC key. Then navigate to System Configuration. This will allow you to configure some basic features such as the hostname, welcome banner, and root password.
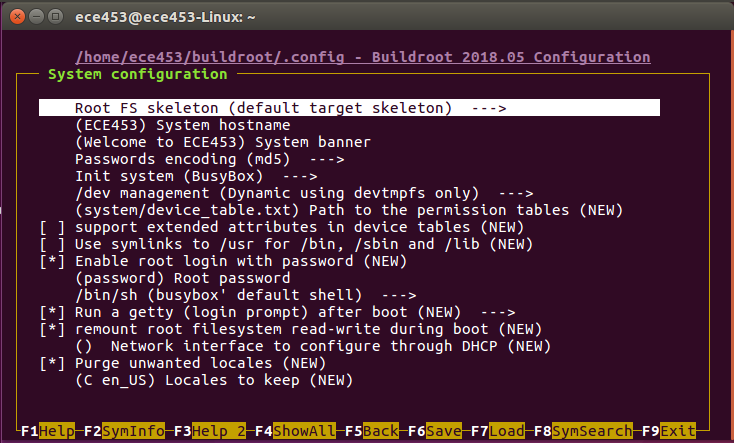
Press ESC again and select Target Packages. Use the down arrow key until you come to Networking Applications. Arrow down until you see openssh. Press the space bar to select openssh. This will allow you to remotely log into your filesystem using SSH.

You can now press ESC until Buildroot asks you to save the configuration. Be sure to save the configuration.
We now need to configure the main piece of software that powers Buildroot. Buildroot is centered around another opensource project called Busybox.
“BusyBox combines tiny versions of many common UNIX utilities into a single small executable.”
make -C buildroot busybox-menuconfig
You can simply select to Exit and save the configuration. After this, you are now ready to build your filesystem.
make -C buildroot all

# When the build is complete, you can find the resulting .tar file
# that contains the filesystem (roughly 8.9MBs).
ls buildroot/output/images/rootfs.tar
This tar file will need to be transferred to a MicroSD card that will be used to boot the SoC. This process is covered in another post.