Overview
This tutorial will give show you how to install Ubuntu on a virtual machine using a free virtualization package called VirtualBox.
Download Linux Distribution ISO
Intel SoCs require us to use Quartus Prime. Quartus Prime is currently supported by Ubuntu 16.04 LTS, so that’s the flavor of Linux that will be used for the purposes of this class. You can download the 64-bit version of the ISO here.
Download VirtualBox
If you do not already have VirtualBox installed, you can use the following link. This tutorial will use a Windows PC as the host environment, so we will use the Windows Host link. Run the installer when it has finished downloading. You can use the default installation settings during the installation.
Create a new Virtual machine
Once VirtualBox has been installed, you should click on the New icon. In the dialog that appears, specify a name for the new virtual machine. In this case, I supplied the name Ubuntu-16.04. VirtualBox auto filled the remainder of the information. When finished, click Next to continue.

Now you will need to specify the amount of physical memory on the host PC that will be dedicated to running the virtual machine. I’m going to specify 2GBs (2048 MB) of RAM and then select Next.

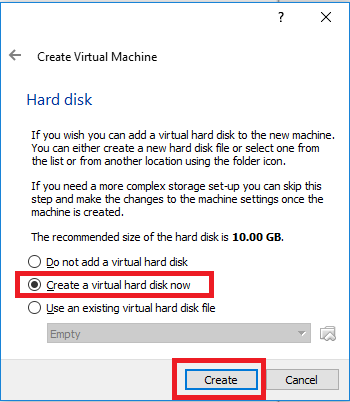
The next dialog will ask you to create a new virtual hard disk. Select Create a virtual hard disk now, and then select Create.
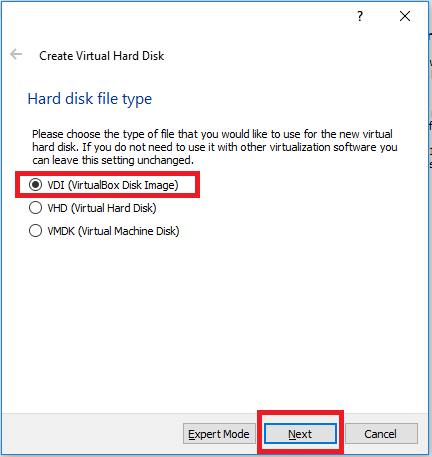
For the Hard Disk file type, select VDI and then click on Next.
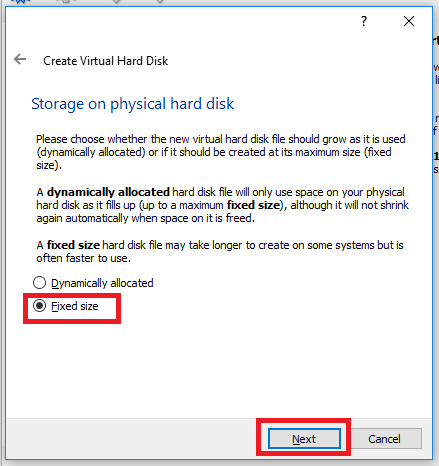
On the next dialog, we will select a Fixed size virtual hard disk for the sake of performance and then select Next.
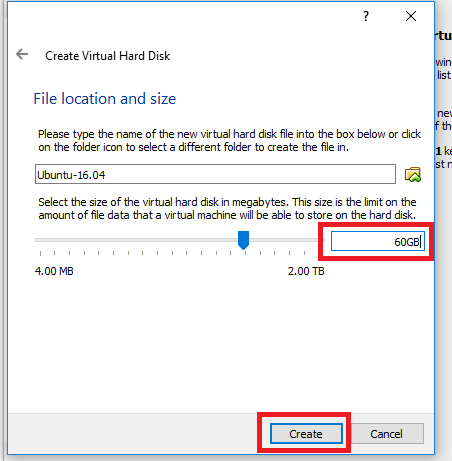
Specify a virtual hard drive size of 60GBs and then select Create. It will take a few minutes to create the empty hard drive.
Installing Linux
Now that the virtual machine has been created, you will need to install the Linux operating system on the virtual machine.
In order to install Ubuntu, we need to attach the Ubuntu ISO to the virtual machines CD driver. This can be done under Machine?Settings. In the dialog that opens up, select Storage. You will now click on Controller: IDE. next, Click on Empty. Click on the CD icon to the right and select Choose Virtual Optical Disk File. You will now be able to navigate to the Ubuntu ISO that you downloaded earlier.

Click OK. You can now power on the virtual machine by double clicking on it in the list of virtual machines. You will now begin the Ubuntu installation process. Be sure to select Install Ubuntu.

Select to Download updates while installing Ubuntu. You can use the defaults for the remainder of the questions. Eventually, you will come to a screen where you have to give the virtual machine a name. In this example, I’m going to choose the following information.

The installation will take a few minutes to complete. When the installation has completed, instruct Ubunto to restart. The Ubuntu ISO will automatically be removed for you.
Virtual Guest Additions
You will now want to install the Virtual Box Guest Additions. From the virtual machine, select Devices?Insert Guest Additions CD Image. You will then supply your VM’s password to install the guest additions.
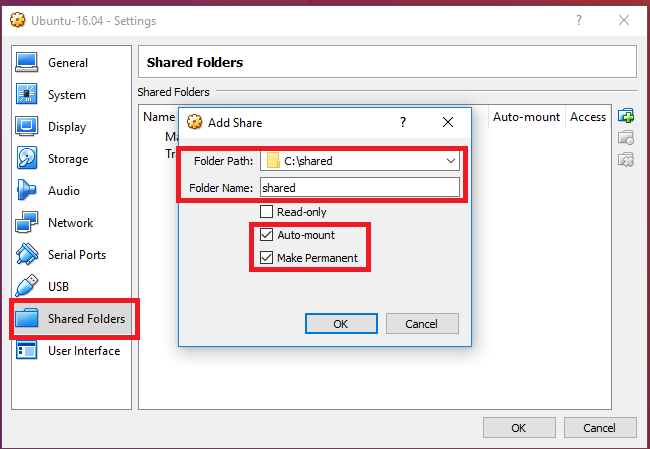
Virtual Box Shared Folders
It is quite common to share files between the Linux VM and the Windows host. In order to do that, we need to set up a shared folder. Select Machine?Settings?
Next, use the Ubuntu Launcher and type in Terminal.
From the terminal, you will use the following command to add your user account (ece453 in this example) to the vboxsf group.

You will now need to instruct Ubuntu to Shutdown?Reset
After Ubuntu restarts, you will log in and open the terminal again. You will now create a symbolic link to the shared directory.

Once this is done, any files in the /home/ece453/shared will be accessible to the Windows host using C:shared.
Shared Clipboard
Most likely, you will want to be able to copy and paste between the VM and Windows host. You can turn this ability on using Devices?Shared Clipboard?Bidirectional
Accessing USB Devices from Virtual Box
We will use a USB to ?SD card adapter to configure ?SD card used to boot the DE1-SoC. Plug this adapter into your PC. You may see Windows throw up some errors about not being able to boot the device. You can ignore them. We want this adapter to be connected to the Linux VM, so we will need to set this up in the VMs settings.
Go to Devices?USB?USB Settings
From the resulting dialog, select the Add icon and choose the name of the USB adapter that you have (Transcend in this case).

When you are done, click on the OK button. The next time you plug in your USB adapter, it will be connected to the Linux VM instead of the Windows Host.
You will also need to install the Virtual Box Extension Pack from the VirtualBox website to enable USB 3.0 support. Once you have downloaded the extension pack, go to File > Preferences > Extensions > Add New Package, Navigate to the package. You should then shutdown the virtual machine.
Under Settings > USB, select USB 3.0. You are now ready to restart the Virtual Machine.
